Morning:
1. What is Node.js? Node.js is a runtime environment that lets you execute JavaScript on the server-side. It is built on Chrome’s V8 JavaScript engine and provides an asynchronous, event-driven architecture.
2. Event Loop and Non-blocking I/O The event loop is the heart of Node.js’s non-blocking I/O. It allows Node.js to perform non-blocking operations without the need for multi-threading. This means Node.js can handle many connections simultaneously without creating a new thread for each connection.
3. Setting up a Node.js Project or file creating folder inside the project /api and create api-be.js
4. Introduction to Express.js Express.js is a fast, unopinionated, minimalist web framework for Node.js, which simplifies the process of building web applications and APIs.
To install:
npm install express
Afternoon:
If you dont have mongodb you can install following the next commands
macOS:
Using Homebrew:
# First, update Homebrew
brew update

# Install MongoDB
brew tap mongodb/brew
brew install mongodb-community@5.0

# To start MongoDB
brew services start mongodb/brew/mongodb-community
Ubuntu (Using the official MongoDB repository):
# Import the public key
wget -qO - https://www.mongodb.org/static/pgp/server-5.0.asc | sudo apt-key add -

# Add the MongoDB repository
echo "deb [ arch=amd64,arm64 ] https://repo.mongodb.org/apt/ubuntu focal/mongodb-org/5.0 multiverse" | sudo tee /etc/apt/sources.list.d/mongodb-org-5.0.list

# Update local package database
sudo apt-get update

# Install MongoDB packages
sudo apt-get install -y mongodb-org

# Start MongoDB
sudo systemctl start mongod

# If you want MongoDB to start on boot
sudo systemctl enable mongod
Note: Replace focal with the appropriate code name of your Ubuntu version if you’re not on Ubuntu 20.04 (Focal Fossa).
Windows:
- Download the MongoDB installer from the official MongoDB website.
- Run the downloaded MSI file.
- Follow the installation wizard to complete the installation.
- After installation, you can run MongoDB by navigating to the installation directory, usually
C:\Program Files\MongoDB\Server\<version>\bin, and runningmongod.exe.
For more advanced configurations, integrations, or specific OS instructions, refer to the official MongoDB documentation.
1. Building RESTful APIs with Express.js add the next code inside to file api-be.js
install mongoose
npm install mongoose
// or using yarn
yarn add mongoose
Here’s a simple example of creating an API endpoint to fetch a list of items:
//api-be.js content
const express = require('express');
const mongoose = require('mongoose');
const cors = require('cors');

const app = express();
const PORT = 3000;

// Connect to MongoDB using Mongoose
mongoose.connect('mongodb://localhost:27017/mydatabase', {
  useNewUrlParser: true,
  useUnifiedTopology: true,
  useFindAndModify: false,
  useCreateIndex: true
});

// Define the mongoose schema and model
const ItemSchema = new mongoose.Schema({
  name: String
});
const Item = mongoose.model('Item', ItemSchema);

// Middleware to parse JSON requests
app.use(cors());
app.use(express.json());

// Function to initialize DB with 5 elements
async function initializeItems() {
  const itemCount = await Item.countDocuments();
  if (itemCount === 0) {
    const defaultItems = [
      { name: "Item 1" },
      { name: "Item 2" },
      { name: "Item 3" },
      { name: "Item 4" },
      { name: "Item 5" }
    ];
    await Item.insertMany(defaultItems);
    console.log("5 items initialized in the database");
  } else {
    console.log("Database already has items");
  }
}

// Function to add a new item to the database
async function addItem(itemName) {
  const item = new Item({ name: itemName });
  await item.save();
  return item;
}

// Function to delete an item from the database
async function deleteItem(itemId) {
  const result = await Item.findByIdAndRemove(itemId);
  return result;
}

// API Endpoint to fetch all items
app.get('/items', async (req, res) => {
  try {
    const items = await Item.find();
    res.json(items);
  } catch (err) {
    res.status(500).json({ message: err.message });
  }
});

// API Endpoint to add a new item
app.post('/items', async (req, res) => {
  try {
    const item = await addItem(req.body.name);
    res.status(201).json(item);
  } catch (err) {
    res.status(400).json({ message: err.message });
  }
});

// API Endpoint to delete an item
app.delete('/items/:id', async (req, res) => {
  try {
    const result = await deleteItem(req.params.id);
    if(result) {
      res.json({ message: 'Item deleted successfully' });
    } else {
      res.status(404).json({ message: 'Item not found' });
    }
  } catch (err) {
    res.status(500).json({ message: err.message });
  }
});

// Start the server after initializing the items
initializeItems().then(() => {
  app.listen(PORT, () => {
    console.log(`Server running on http://localhost:${PORT}`);
  });
});
2. Create FrontEnd in vue3.js for show items
Now, in the src directory, create a new component called
Now, in the src directory, create a new component called ItemsFromMongo.vue:
<template>
  <div>
    <h2>List of Items from Database</h2>
    <p>
      In this component you can review how can be loading different items from
      mongoDB you can add and delete items
    </p>
    <ul>
      <li v-for="item in items" :key="item._id">
        {{ item.name }}
        <button @click="deleteItem(item._id)">Delete</button>
      </li>
    </ul>
    <input v-model="newItem" placeholder="New item name" />
    <button @click="addItem">Add Item</button>
  </div>
</template>

<script>
export default {
  data() {
    return {
      items: [],
      newItem: "",
    };
  },
  async created() {
    try {
      const response = await fetch("http://localhost:3000/items");
      this.items = await response.json();
    } catch (error) {
      console.error("An error occurred:", error);
    }
  },
  methods: {
    async addItem() {
      try {
        const response = await fetch("http://localhost:3000/items", {
          method: "POST",
          headers: {
            "Content-Type": "application/json",
          },
          body: JSON.stringify({ name: this.newItem }),
        });
        const item = await response.json();
        this.items.push(item);
        this.newItem = ""; // Clear the input field
      } catch (error) {
        console.error("An error occurred:", error);
      }
    },
    async deleteItem(itemId) {
      try {
        await fetch(`http://localhost:3000/items/${itemId}`, {
          method: "DELETE",
        });
        this.items = this.items.filter((item) => item._id !== itemId);
      } catch (error) {
        console.error("An error occurred:", error);
      }
    },
  },
};
</script>
for run backend api file you have to go in /api folder and run
node api-be.js
//after that the server is running and you can check the items on this link of your browser
//http://localhost:3000/items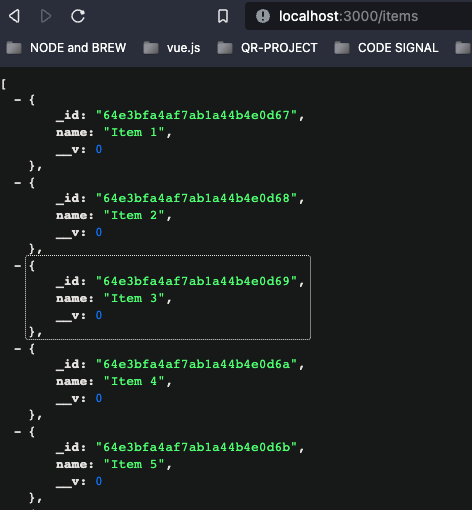
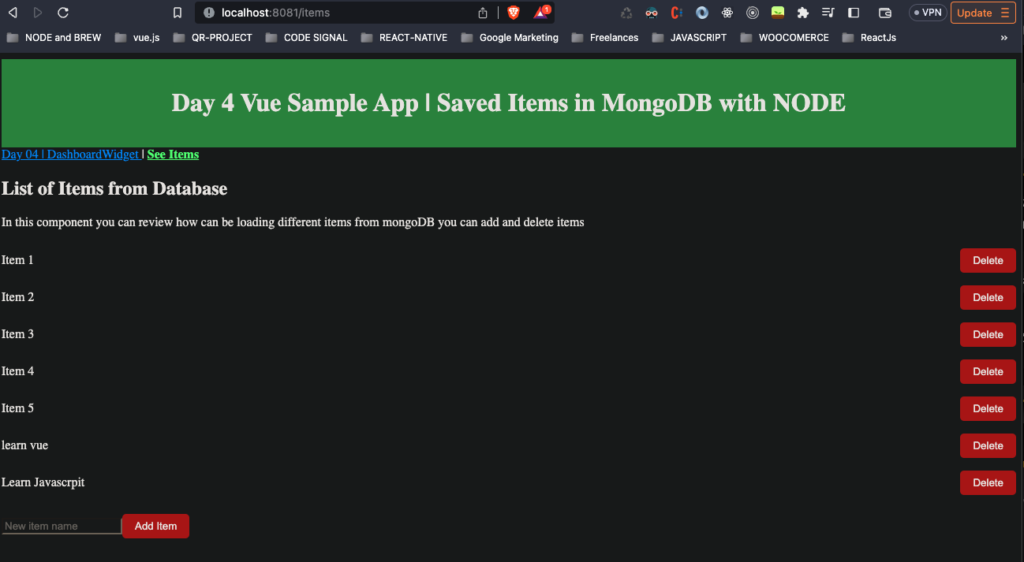
And when u running your backend server you should be run the front end simply running up yarn serve and checkout your webapp like this image below
If you want checkout this project you can clone from this link https://github.com/LeoReyesDev/vue-tutorial/tree/day04-sample/
